TL;DR
Drag-and-drop features are now common across modern web applications. They can be used to arrange items in order, categorize things, and perform other tasks. This makes a visual impact on the user, indicating that they are working and something is moving. Additionally, it can be helpful when multiple actions are needed to perform, making it easy to drag and drop.
The Kanban Board is one of those examples where you can see the drag-and-drop of a component in its peak form. Most of the to-do lists use this Kanban board to manage the order and progress of tasks. As developers, we have seen it multiple times in JIRA boards.
So, today we are going to build our kanban board that can be used at multiple places as per requirement.
So, let’s get started.
Prerequisite and Project Setup
To build this, we should have some basic knowledge about the following:
- JavaScript
- React
- TailwindCSS
If you have this knowledge, you are good to go with the building of the kanban board. As per the project setup, we are using NextJS, a framework of React.
You can set up the project with the following command:
npx create-next-app@latest
We'll use the following packages:
- @dnd-kit/core: This is for the drag and drop functionality.
- sonner: This is a toast component to display any message regarding an update or error.
You can install these libraries using the following command:
npm install @dnd-kit/core sonner
Dnd-Kit
@dnd-kit – A lightweight, modular, performant, accessible, and extensible drag & drop toolkit for React.

This kit can be divided into 4 major topics. Here are those:
: This is used as the main provided that wraps the functionality of draggable and droppable. - Sensors: It is used to map which actions should trigger the draggable action. These actions can be done by mouse, touch, keyboard, etc.
- Droppable: This marks which zone is droppable and which is not. In the case of Kanban, it can be columns.
- Draggable: Draggable items are the items that can be dragged from one drop zone to another.
We are going to use this to build our Kanban board.
Code
Now, let's start coding by defining the context Draggable and Droppable that can be used by others too.
draggable.tsx
The code below is for the Draggable Component that uses the useDraggable hook from dnd-kit. Using this component, we can wrap any item that can be draggable.
Create a draggable.tsx file to add the below code.
    import { useDraggable } from "@dnd-kit/core";
    import React from "react";
    export function Draggable({
      id,
      children,
    }: {
      id: string;
      children: React.ReactNode;
    }) {
      const { attributes, listeners, setNodeRef, transform } = useDraggable({
        id: id,
      });
      const style = transform
        ? {
            transform: `translate3d(${transform.x}px, ${transform.y}px, 0)`,
          }
        : undefined;
      return (
        <div ref={setNodeRef} style={style} {...listeners} {...attributes}>
          {children}
        </div>
      );
    }
droppable.tsx
Below is the droppable code
    import { useDroppable } from "@dnd-kit/core";
    import React from "react";
    export function Droppable({
      id,
      children,
    }: {
      id: string;
      children: React.ReactNode;
    }) {
      const { isOver, setNodeRef } = useDroppable({
        id: id,
      });
      const style = {
        border: isOver ? "" : "none",
      };
      return (
        <div ref={setNodeRef} style={style}>
          {children}
        </div>
      );
    }
Sensors and handleDrag Function
1. Sensor
We need to define which sensors should be supported for the Kanban. Now we are going to use the PointerSensor, which is used for the mouse pointer, and the KeyboardSensor for keyboard-based drag and drop.
    const sensors = useSensors(
        useSensor(PointerSensor),
        useSensor(KeyboardSensor)
      );
2. handleDragStart
This function will run when the drag is started. Here we are just setting the state with the item that is being dragged now.
  const handleDragStart = (event: any) => {
    setActiveId(event.active.id);
  };
3. handleDragEnd
This will handle when the drop is done, and we can use this to verify whether the drop is valid or not. If not valid, then send back the item to the initial dropzone. In Kanban, we can use it so that tasks move forward only, rather than backward too.
Here we can also call any API to update the database.
    const handleDragEnd = (event: any) => {
      const { active, over } = event;
      document.body.style.cursor = "";
      setActiveId(null);

      if (!over || active.id === over.id) return;

      const oldIndex = data.findIndex((item) => item.id === active.id);
      const fromStatus = data[oldIndex].status;
      const toStatus = over.id;

      const fromIndex = board.findIndex((col) => col.id === fromStatus);
      const toIndex = board.findIndex((col) => col.id === toStatus);

      // Prevent moving backward in status
      if (toIndex < fromIndex) {
        toast.error("You can't move tasks backward in the flow.");
        return;
      }

      // Only update if status is actually changing
      if (fromStatus !== toStatus) {
        const updatedItem = { ...data[oldIndex], status: toStatus };
        const updatedData = [...data];
        updatedData[oldIndex] = updatedItem;
        setData(updatedData);
      }
    };
Complete code of the page.tsx
Below is the complete code for the page.tsx that is handling the columns with CSS and Context. We have used the dummy data to replicate data from the backend.
    "use client";

    import { useEffect, useState } from "react";
    import Link from "next/link";
    import {
      DndContext,
      DragOverlay,
      KeyboardSensor,
      PointerSensor,
      useSensor,
      useSensors,
    } from "@dnd-kit/core";
    import { Draggable } from "./draggable";
    import { Droppable } from "./droppable";
    import { toast } from "sonner";

    // 🟩 Dummy Board Columns
    const board = [
      { id: "idea", name: "Idea", color: "#DD3AEB" },
      { id: "todo", name: "To Do", color: "#3B82F6" },
      { id: "in_progress", name: "In Progress", color: "#D1B357" },
      { id: "done", name: "Done", color: "#10B981" },
    ];

    // 🟩 Dummy Data (No axios)
    const dummyData = [
      {
        id: "1",
        first_name: "Suraj",
        last_name: "Vishwakarma",
        title: "Complete Website Medusa",
        desc: "Build the ecommerce website using medusa.",
        status: "idea",
      },
      {
        id: "5",
        first_name: "Alice",
        last_name: "Wong",
        title: "Complete Website Medusa",
        desc: "Build the ecommerce website using medusa.",
        status: "idea",
      },
      {
        id: "6",
        first_name: "Alice",
        last_name: "Wong",
        title: "Complete Website",
        desc: "Build the loan application website using React and Tailwind CSS.",
        status: "todo",
      },
      {
        id: "2",
        first_name: "Bob",
        last_name: "Smith",
        title: "Write Article",
        desc: "Finish the article explaining how to build a Kanban board.",
        status: "todo",
      },
      {
        id: "3",
        first_name: "Clara",
        last_name: "Johnson",
        title: "Fix Bugs",
        desc: "Resolve drag-and-drop bugs and make the board mobile-friendly.",
        status: "in_progress",
      },
      {
        id: "4",
        first_name: "David",
        last_name: "Lee",
        title: "Refactor Code",
        desc: "Clean up the Kanban board code and optimize performance.",
        status: "done",
      },
    ];

    // 🟩 Card UI (No Avatar component, just initials)
    const BoardCard = ({ data }: { data: any }) => {
      return (
        <div className="p-3 rounded-lg border border-[#313248] bg-[#1D1E2B] space-y-2">
          <div className="flex justify-between">
            <p className="font-semibold text-base">{data?.title}</p>
          </div>
          <div className="flex justify-between">
            <p className="font-light text-sm">{data?.desc}</p>
          </div>
          <div className="flex justify-between">
            <div>
              <p className="text-white text-sm">{`${data?.first_name} ${data?.last_name}`}</p>
              <p className="text-gray-400 text-sm">{data?.code}</p>
            </div>
          </div>
        </div>
      );
    };

    // 🟩 Column Board
    const Board = ({
      id,
      name,
      color,
      data,
    }: {
      id: string;
      name: string;
      color: string;
      data: any[];
    }) => {
      return (
        <Droppable id={id}>
          <div className="bg-[#191A23] rounded-lg border border-[#292A37] h-[700px] mb-4 overflow-hidden">
            <p className="text-sm font-semibold p-3" style={{ color }}>
              {name} {data.filter((item) => item.status === id).length}
            </p>
            <hr className="border-[#292A37]" />
            <div className="p-4 h-[calc(100%-56px)] overflow-y-auto space-y-3 scrollbar-hide">
              {data.map((item) =>
                item.status === id ? (
                  <Draggable key={item.id} id={item.id}>
                    <Link href={`#`} className="block">
                      <BoardCard data={item} />
                    </Link>
                  </Draggable>
                ) : null
              )}
            </div>
          </div>
        </Droppable>
      );
    };

    // 🟩 Main Board Component
    const Page = () => {
      const [data, setData] = useState(dummyData);
      const [activeId, setActiveId] = useState<string | null>(null);

      const sensors = useSensors(
        useSensor(PointerSensor),
        useSensor(KeyboardSensor)
      );

      const handleDragStart = (event: any) => {
        setActiveId(event.active.id);
      };

      const handleDragEnd = (event: any) => {
        const { active, over } = event;
        document.body.style.cursor = "";
        setActiveId(null);

        if (!over || active.id === over.id) return;

        const oldIndex = data.findIndex((item) => item.id === active.id);
        const fromStatus = data[oldIndex].status;
        const toStatus = over.id;

        const fromIndex = board.findIndex((col) => col.id === fromStatus);
        const toIndex = board.findIndex((col) => col.id === toStatus);

        // Prevent moving backward in status
        if (toIndex < fromIndex) {
          toast.error("You can't move tasks backward in the flow.");
          return;
        }

        // Only update if status is actually changing
        if (fromStatus !== toStatus) {
          const updatedItem = { ...data[oldIndex], status: toStatus };
          const updatedData = [...data];
          updatedData[oldIndex] = updatedItem;
          setData(updatedData);
        }
      };

      return (
        <div className="max-w-[1200px] mx-auto">
          <p className="text-center text-2xl py-10 font-medium text-purple-400">
            Kanban Board
          </p>
          <DndContext
            sensors={sensors}
            onDragStart={handleDragStart}
            onDragEnd={handleDragEnd}
          >
            <div className="grid grid-cols-4 gap-4 px-6 overflow-hidden">
              {board.map((item) => (
                <Board
                  key={item.id}
                  id={item.id}
                  name={item.name}
                  color={item.color}
                  data={data}
                />
              ))}
            </div>
            <DragOverlay>
              {activeId ? (
                <BoardCard data={data.find((item) => item.id === activeId)} />
              ) : null}
            </DragOverlay>
          </DndContext>
        </div>
      );
    };

    export default Page;
CodeSandbox
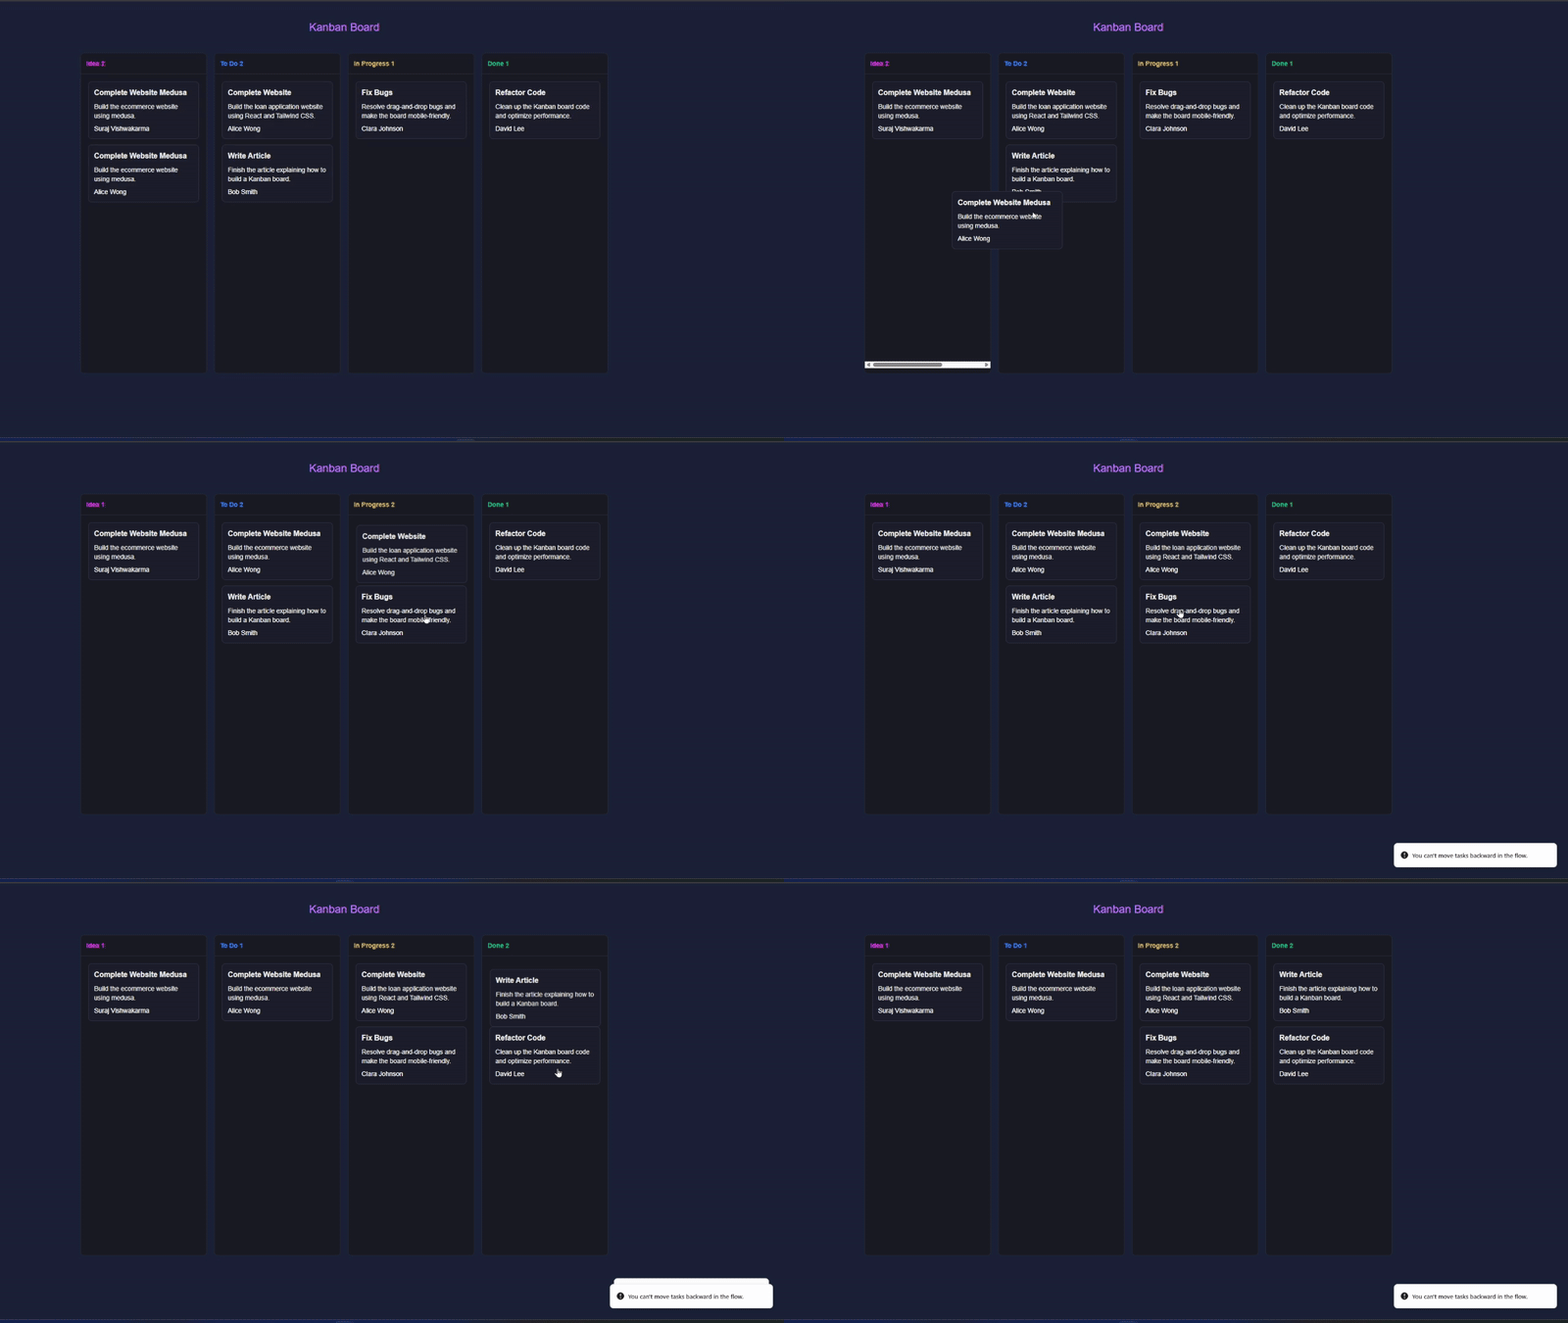
Below is the GIF showcasing the working of the Kanban board. You can find the complete code and working using the CodeSandBox through here.

Connect with Me🚀
Let's connect and stay informed on all things tech, innovation, and beyond!
Also, I am open to writing freelance articles if you are interested; then contact me via email or social media.
Conclusion
Building a Kanban board with drag and drop functionality helps in learning the uses of drag and drop with applications such as JIRA, Trello, etc. This can be used to
Through this walkthrough, you’ve seen how to:
- Set up a basic Next.js project with Tailwind CSS
- Use
DndContext,Draggable, andDroppablecomponents from DnD Kit - Configure sensors for mouse and keyboard interaction
- Implement logic to control drag behavior and update task states dynamically
- Use toast notifications to provide user feedback
This can be used in your own task managers, product boards, or any app that requires visual task progress tracking. I hope this article has helped you in learning some useful ways of integrating drag and drop in your next project. Thanks for reading the article.


