How to Build Your Own ChatGPT with Langchain, Supabase, and Node.js

How to Build Your Own ChatGPT with Langchain, Supabase, and Node.js
Suraj Vishwakarma
Updated
Originally Published
Navigation Map
Introduction
Generative AI has become more popular and powerful over time. They can now generate more logical responses to any query with lots of data processing in the backend. With the power of generative AI, we can generate diverse outputs across mediums, from captivating visuals to engaging text and soul-stirring music, generative AI emerges as an invaluable tool, elevating the realms of innovation and artistic expression to unprecedented heights.
ChatGPT has been the face of the Generative AI. It can run queries over the data that it had been trained. But today, we will run ChatGPT commands over our data to extract useful responses. We will use the Langchain as the framework to work with the ChatGPT API and load the data. With Supabase, we will store the loaded data in the database for easy access while quering.
We will discuss the tools and their uses in the article with code examples. Also, It will be a web application that uses HTML, CSS, and NodeJS. So having prior knowledge about this will help you to grasp the tutorial more easily.
Now, let’s get started.
Client Side
Rather than using a client-side building framework such as React or Vue, we are going to use simple HTML, CSS, and JS files to build our client. If you are going to build a bigger project then you can use a framework.
The project structure will look like this when we integrate the server component.
    - OWN-CHATGPT
      - lib
        - openai.js
        - supabase.js
      - index.html
      - script.js
      - server.js
      - styles.css
Let’s start with the index.html.
index.html
In this file, we have created a basic HTML structure to get data in the input from the user for the query. After the clicking on submit button, we will run the script that will fetch the information from the server and then display that information on the webpage. We have also created a button that will load the data.
    <!DOCTYPE html>
    <html lang="en">
    <head>
        <meta charset="UTF-8">
        <meta name="viewport" content="width=device-width, initial-scale=1.0">
        <link rel="stylesheet" href="styles.css">
        <title>Own ChatGPT</title>
    </head>
    <body>
        <div class="form-container">
            <form id="myForm">
                <label for="textInput">Input Text:</label>
                <input type="text" id="textInput" required>
                <button type="submit" id="submitButton">Submit</button>
            </form>


            <button id="loadDataButton">Load Data</button>
            <div id="loader" class="hidden"></div>
            <div id="response" class="hidden"></div>
        </div>
        <script src="script.js"></script>
    </body>
    </html>
styles.css
You can look into the styles that we have used here.
    body {
        font-family: Arial, sans-serif;
        display: flex;
        align-items: center;
        justify-content: center;
        height: 100vh;
        margin: 0;
        background-color: #f4f4f4;
    }
    .form-container {
        text-align: center;
    }
    #myForm {
        max-width: 400px;
        margin: auto;
        background-color: #fff;
        padding: 20px;
        border-radius: 8px;
        box-shadow: 0 0 10px rgba(0, 0, 0, 0.1);
    }
    label {
        display: block;
        margin-bottom: 8px;
    }
    input {
        width: 100%;
        padding: 8px;
        margin-bottom: 16px;
        box-sizing: border-box;
    }
    button {
        background-color: #007bff;
        color: #fff;
        padding: 10px 15px;
        border: none;
        border-radius: 4px;
        cursor: pointer;
    }
    button:hover {
        background-color: #0056b3;
    }
    .hidden {
        display: none;
    }
    #loadDataButton {
        margin-left: 55px;
        background-color: #28a745;
        color: #fff;
        padding: 10px 15px;
        border: none;
        border-radius: 4px;
        cursor: pointer;
        margin-top: 10px;
    }
    #loader {
        background: url('loader.gif') no-repeat center center;
        height: 50px;
        width: 50px;
        display: inline-block;
        margin-top: 10px;
    }
    #response {
        margin-top: 20px;
    }
script.js
Let’s discuss the script file. The script is useful in sending queries to the server and fetching the data from the server. Here are three important elements of the script.
- submi-EventListner: We have an event listener to look for the submit button when clicked. This will get the Input value and send the query to the server.
- click-Eventlistener: This will send the request to the server to load the data. The PDF will be mentioned on the server.
- postData: We have a particular function to send queries to the server. The fetched response is then displayed to the user.
    document.addEventListener('DOMContentLoaded', function () {
        const form = document.getElementById('myForm');
        const loadDataButton = document.getElementById('loadDataButton');
        const loader = document.getElementById('loader');
        const responseDiv = document.getElementById('response');
        form.addEventListener('submit', async function (event) {
            event.preventDefault();
            const inputText = document.getElementById('textInput').value;
            // Show loader while waiting for the server response
            loader.classList.remove('hidden');
            try {
                const response = await postData(inputText);
                // Display the server response
                responseDiv.innerHTML = `Server Response: ${response.answer}`;
                responseDiv.classList.remove('hidden');
            } catch (error) {
                console.error('Error:', error);
                // Handle error if needed
            } finally {
                // Hide the loader after the server response is received
                loader.classList.add('hidden');
            }
        });
        loadDataButton.addEventListener('click', async function () {
            // Show loader while waiting for the server response
            loader.classList.remove('hidden');
            try {
                // Make a request to the server's /loadingdata endpoint
                const response = await fetch('http://localhost:5000/loadingdata');
                const data = await response.json();
                // Display the server response
                console.log(data)
                responseDiv.innerHTML = `Server Response: ${data.message}`;
                responseDiv.classList.remove('hidden');
            } catch (error) {
                console.error('Error:', error);
                // Handle error if needed
            } finally {
                // Hide the loader after the server response is received
                loader.classList.add('hidden');
            }
        });
        async function postData(data) {
            const url = 'http://localhost:5000/querydata'; // Replace with your server endpoint
            const options = {
                method: 'POST',
                headers: {
                    'Content-Type': 'application/json',
                },
                body: JSON.stringify({ query: data }),
            };
            const response = await fetch(url, options);
            const result = await response.json();
            return result;
        }
    });
Concept of Creating Own ChatGPT
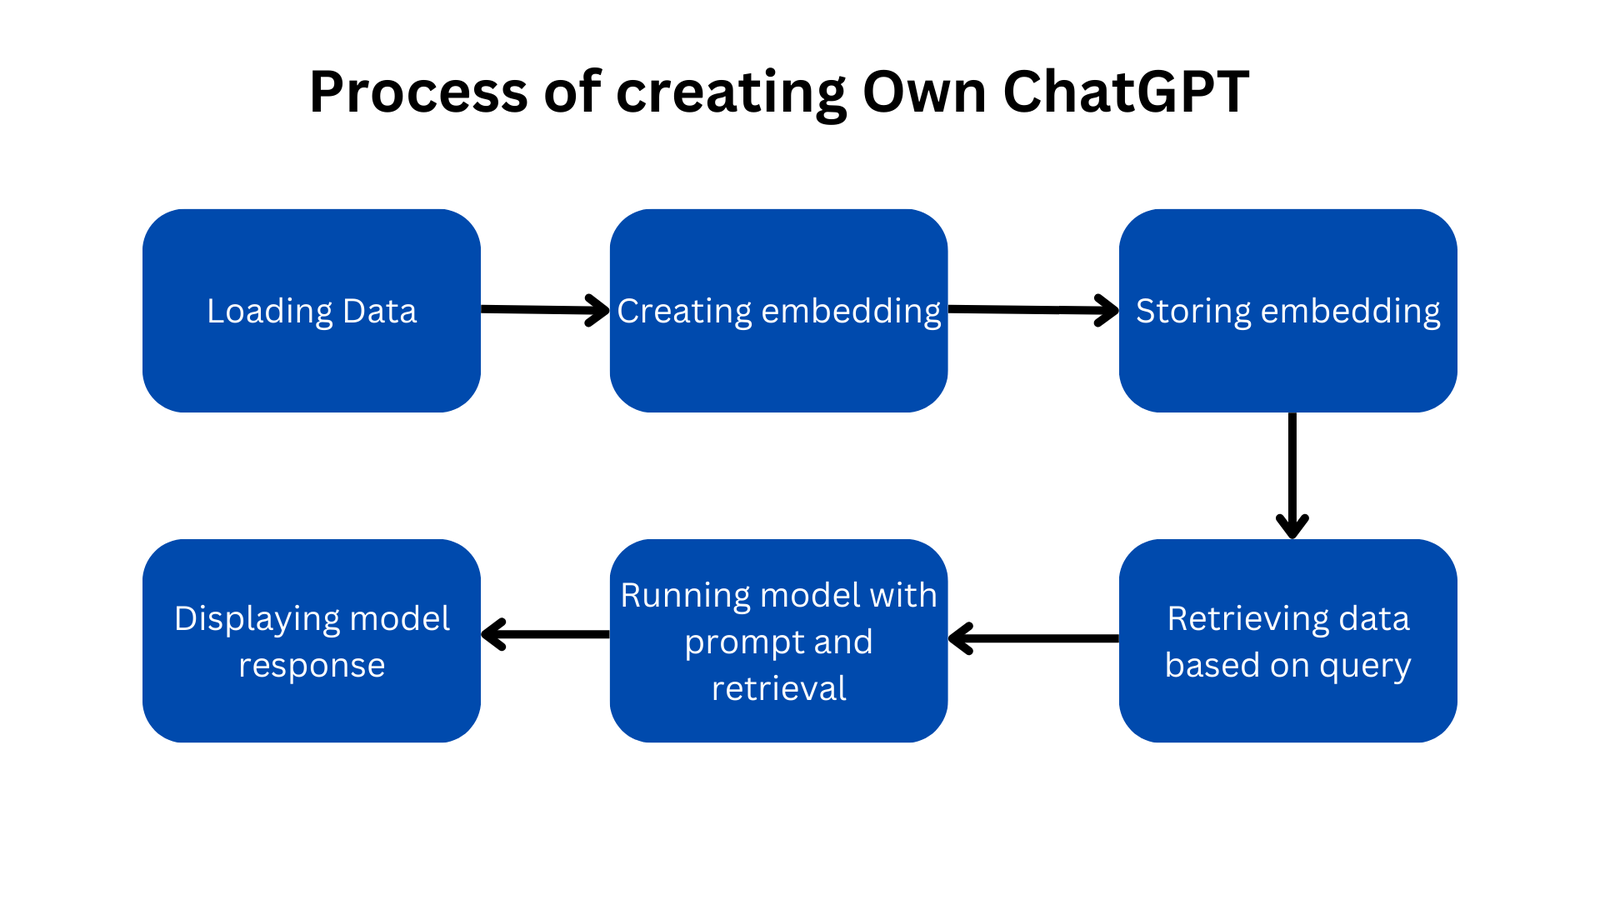
Before writing the code, first, let’s understand what we are going to do on the server. Here are the functions that we are going to perform:
Loading Data: To create our own ChatGPT that runs on our data, we need to first load the data. We are going to use a PDF loader to load the data from a PDF.
Creating Embedding: Since the language model does not understand natural language, we first need to convert the loaded PDF data into embedding. Embedding is used to represent words in multi-dimensional vector format. Each word is given a numeric value in terms of vectors. You can learn more about embedding through one of my articles, What is Embedding? Generating Embedding using Supabase. For creating embedding we are going to use the ChatGPT embedding model.
Storing Embedding: We need to store the created embedding for further queries. We are using Supabase for storing the embedding.
Retrieving data based on the query: Now, when the user makes the query to the server. Based on the query, we need to fetch the embedding data from the Supabase that matches the query. This is called retrieval. Also, we need to create embedding of the query. This will be handled by Langchain. We will create a function in Supabase that will match data With query.
Running Model: After getting the matched retrieval, we will now pass the retrieval and the prompt to the ChatGPT model. Based on this, the model will generate the response.
Here is the visual representation of the process.
Server Side
Now, let’s create the server. First, we need to initialize a package.json for managing the package. Run the below command in the root directory:
npm init -yNote: Node and NPM should be pre-installed on your machine for all these commands to run successfully. You can install the Node from here.
This will create a basic package.json without any repository. After this, we need to install the necessary packages. There are the commands to install those:
npm i cors express langchain pdf-parse @supabase/supabase-jsHere are the details on each package:
cors: To manage all cors-related functions. We will allow all the origin for test purposes. You can change according to you.
express: We are using express to build our server. This handles the route and JSON parser when exchanging data between client and server.
langchain: It is a framework designed to simplify the creation of applications using large language models. It will be useful in creating efficient prompts and integrating ChatGPT models with our application.
pdf-parse: It will be useful in extracting the text from PDF.
@supabase/supabase-js: This is the JS library to integrate supabase in our application.
Supabase
Along with providing a database, Supabase has a powerful backend-as-a-service platform that allows developers to easily build scalable web applications with serverless functions and a PostgreSQL database. Along with that, It also provides Authentication, instant APIs, Realtime subscription, and Vector embedding. We are going to use the supabase to store the Vector Embedding. First, we need to create a project in the Supabase Dashboard.
Visit supabase.com then click on Start your project from the right of the nav bar. This will take you to the sign-in page. Enter your details for sign-in or sign-up as you require. After logging in, you will be redirected to the project page. From here, click on New Project to create a project. You need to create an organization first. Create that first and then on the Create New Project page, you will be asked to enter details of your project.

After filling in the details, click on Create new project. It will take a few minutes to set up the project.
Creating the lib directory
We are going to use the two important libraries that is Supabase and OpenAI. For supabase, we have the JS library and OpneAI will be provided by Lanchain. Create a lib directory in the root. Create the two files in the lib directory, supabase.js and openai.js.
supabase.js
    import { createClient } from '@supabase/supabase-js'

    const supabaseUrl = "SUPABASE_URL"
    const supabaseAnon = "SUPABASE_ANON_KEY"

    export const supabase = createClient(supabaseUrl, supabaseAnon)
SUPABASE_URL and SUPABASE_ANON_KEY are secrets that can be found in the Supabase App dashboard. Go to Project Setting → API, you will find it there.
openai.js
    import { ChatOpenAI } from 'langchain/chat_models/openai'
    import { OpenAIEmbeddings } from 'langchain/embeddings/openai'

    const openaiKey = <OPENAI_KEY>

    export const llm = new ChatOpenAI({
      openAIApiKey: openaiKey,
      modelName: 'gpt-3.5-turbo',
      temperature: 0.9,
    })

    export const embeddings = new OpenAIEmbeddings({
      openAIApiKey: openaiKey,
    })
For OPENAI_KEY, you can log in to the official API platform from here. After login, you can find the API key from API keys tab. If you create a new account, you will get the free credits to use.
We have created two models, one for generating embedding and another one is making queries to the ChatGPT model 3.5.
server.js
Here is the code for the server.js. Create this file in the root.
    import express from "express";
    import cors from "cors";
    import { PDFLoader } from "langchain/document_loaders/fs/pdf";
    import { SupabaseVectorStore } from "langchain/vectorstores/supabase";
    import { supabase } from "./lib/supabase.js";
    import { llm, embeddings } from "./lib/openai.js";
    import { SupabaseHybridSearch } from "langchain/retrievers/supabase";
    import {
      RunnablePassthrough,
      RunnableSequence,
    } from "langchain/schema/runnable";
    import { StringOutputParser } from "langchain/schema/output_parser";
    import {
      ChatPromptTemplate,
      HumanMessagePromptTemplate,
      SystemMessagePromptTemplate,
    } from "langchain/prompts";
    import { formatDocumentsAsString } from "langchain/util/document";

    const app = express();
    const PORT = 5000;
    app.use(cors());
    // Middleware to parse JSON data
    app.use(express.json());
    // Middleware to parse URL-encoded data
    app.use(express.urlencoded({ extended: true }));

    // Route for loading data
    app.get("/loadingdata", async (req, res) => {
      // Simulate loading data (replace with actual loading logic)
      const loader = new PDFLoader("writing.pdf");
      const docs = await loader.load();

      const vectorStore = await SupabaseVectorStore.fromDocuments(
        docs,
        embeddings,
        {
          client: supabase,
          tableName: "documents",
          queryName: "match_documents",
        }
      );

      res.status(200).send({ message: "Data Loaded Successfully!" });
    });

    // Route for querying data
    app.post("/querydata", async (req, res) => {
      const query = req.body.query;
      // Simulate querying data (replace with actual query logic)
      const retriever = new SupabaseHybridSearch(embeddings, {
        client: supabase,
        //  Below are the defaults, expecting that you set up your supabase table and functions according to the guide above. Please change if necessary.
        similarityK: 2,
        keywordK: 2,
        tableName: "documents",
        similarityQueryName: "match_documents",
        keywordQueryName: "kw_match_documents",
      });
      const SYSTEM_TEMPLATE = `Use the following pieces of context to answer the question at the end.
      If you don't know the answer, just say that you don't know, don't try to make up an answer.
      ----------------
      {context}`;

      const messages = [
        SystemMessagePromptTemplate.fromTemplate(SYSTEM_TEMPLATE),
        HumanMessagePromptTemplate.fromTemplate("{question}"),
      ];
      const prompt = ChatPromptTemplate.fromMessages(messages);
      const chain = RunnableSequence.from([
        {
          context: retriever.pipe(formatDocumentsAsString),
          question: new RunnablePassthrough(),
        },
        prompt,
        llm,
        new StringOutputParser(),
      ]);

      const answer = await chain.invoke(query);
      res.status(200).send({ answer: answer });
    });

    // Start the server
    app.listen(PORT, () => {
      console.log(`Server is running on http://localhost:${PORT}`);
    });
Loading Data Route
Before sending data to Supabase, we need to create a table to store vectors and a function that matches the document to query that we will pass later. Run the below command in the SQL Editor from the Supabase dashboard.
    -- Enable the pgvector extension to work with embedding vectors
    create extension vector;

    -- Create a table to store your documents
    create table documents (
      id bigserial primary key,
      content text, -- corresponds to Document.pageContent
      metadata jsonb, -- corresponds to Document.metadata
      embedding vector(1536) -- 1536 works for OpenAI embeddings, change if needed
    );

    -- Create a function to similarity search for documents
    create function match_documents (
      query_embedding vector(1536),
      match_count int DEFAULT null,
      filter jsonb DEFAULT '{}'
    ) returns table (
      id bigint,
      content text,
      metadata jsonb,
      similarity float
    )
    language plpgsql
    as $$
    #variable_conflict use_column
    begin
      return query
      select
        id,
        content,
        metadata,
        1 - (documents.embedding <=> query_embedding) as similarity
      from documents
      where metadata @> filter
      order by documents.embedding <=> query_embedding
      limit match_count;
    end;
    $$;

    -- Create a function to keyword search for documents
    create function kw_match_documents(query_text text, match_count int)
    returns table (id bigint, content text, metadata jsonb, similarity real)
    as $$

    begin
    return query execute
    format('select id, content, metadata, ts_rank(to_tsvector(content), plainto_tsquery($1)) as similarity
    from documents
    where to_tsvector(content) @@ plainto_tsquery($1)
    order by similarity desc
    limit $2')
    using query_text, match_count;
    end;
    $$ language plpgsql;
After this, If you now see the loadingdata route, we are loading the PDF file using the PDFLoader. writing.pdf is the file in the root. You can change it by putting your file in the root directory. After that, we are storing the data in the Supabase with the supabaseVectorStore method.
If you have data from other sources and format. You can look at this guide from langchaint to load different kinds of data.
Query Data Route
In this route, first, we are getting the query from the body of the request. After that, we create a variable with SupabaseHybridSearch method that will get the retrieval from the Supabase. Next, we are creating the prompt that will be passed to the model.
We are creating a chain that merges the retriever, model, query, and output parser together. After creating the chain, we are invoking it with the query received from the user.
Running the Application
Now, let’s run the application. First, we need to start the server. You can start the server by running the below command from the root directory.
node server.jsNow, run the index.html in the browser. If everything is working then you will see the below screen.
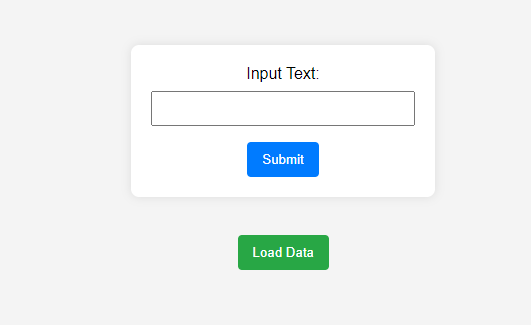
Now, click on the Load Data to create embedding and store it in Supabase. If it gets stored to Supabase, you will see the below screen with the server response.
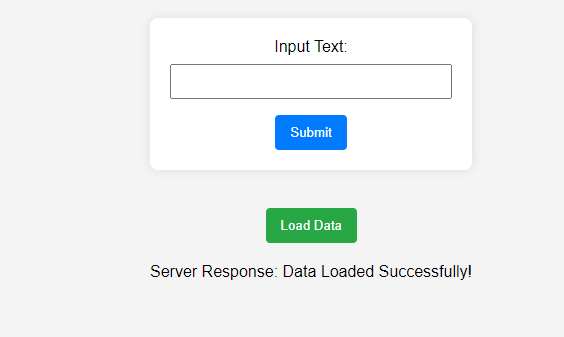
You can check the Supbase Dashboard to confirm whether the data has been successfully loaded or not. If it is stored successfully then you can find the data.

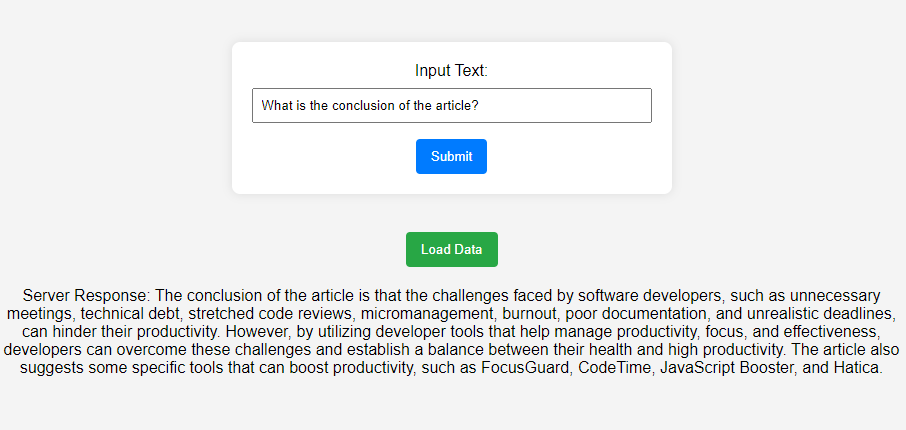
The data is from one of my previous articles. Each page of the PDF is stored in a separate row. Now, let’s make a query to it.
After running the query, you will find the server response as seen in the below image.
Addition Things
I have created the GitHub repository for this project. You can refer here for the code. You can run the project by installing dependencies and adding the API keys to the OpenAI and Supabase libraries.
You can also work on the project to enhance the following:
- Enhance the UI as it is basic right now.
- You can load different kinds of data such as CSV and JSON to Supabase through langchain documentation.
- Using this method, you can create a chatbot that answers according to the documentation of any tool.
Conclusion
We have seen how to integrate ChatGPT with personalized data using Langchain and Supabase, culminating in the development of a web application adept at processing and responding to queries based on specific data sets. The walkthrough covered essential steps from setting up a user-friendly client interface with basic HTML, CSS, and JavaScript, to configuring a robust server-side framework using Node.js.
We have not only clarified the utilization of advanced technologies in web development but also emphasized practical implementation, from data handling to user interface design. Ultimately, this tutorial serves as a foundational resource for those looking to explore the dynamic intersection of AI and web development, offering valuable insights for creating innovative, AI-driven web applications.
I hope this article has provided value to you. Thanks for reading the article.